Please note, all of these are accurate as of 30/07/2024, and only apply to Basic Admin Essentials 2.0, no other versions that may be relaseed in the future, or have been. Thank you.
Hello, and welcome to the Basic Admin Essentials 2.0 Tutorial Hub…
![]() Hiya, thanks for checking out my tutorial! Here, is where I will list all of the modifications, and things I know about BAE 2.0, and how you can modify the system to your liking! They will all be in sections, so feel free to check them all out!
Hiya, thanks for checking out my tutorial! Here, is where I will list all of the modifications, and things I know about BAE 2.0, and how you can modify the system to your liking! They will all be in sections, so feel free to check them all out!
(for this, you will need a fixed version of the BAE 2.0 MainModule, which can be found here! thanks, noah @justhimnoah ![]() )
)
Tutorials & Information
(make sure you have the system set up, with the script inside of ServerScriptService!)
Section One - UI Modifications
Command Confirmation
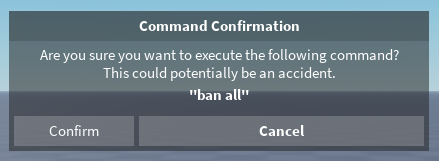
![]() If you want to prevent command abusers, you can use ‘Command Confirmation’ to make a UI appear on the screen, that asks the user if they would like to execute said command. If the player confirms it, a note will be added to the command logs that says
If you want to prevent command abusers, you can use ‘Command Confirmation’ to make a UI appear on the screen, that asks the user if they would like to execute said command. If the player confirms it, a note will be added to the command logs that says (user): Confirmed '(command)'.
![]() To set this up, open the
To set this up, open the MainModule and go to line 103, where it says commandConfirmation = false. Simply change it to true and then it should work!

Editing UI
![]() If we want to edit the BAE 2.0 user interface, you will need to find the
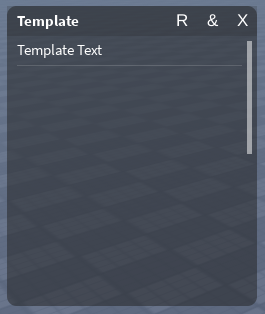
If we want to edit the BAE 2.0 user interface, you will need to find the Essentials Client which can be found by following the path of Basic Admin Essentials 2.0 -> MainModule -> Components -> Essentials Client. When you have found it, move it to StarterGUI, and open up the contents of it. Then, find Base Clip and also open that up.
![]() You are going to see lots of frames, but don’t worry! You can now add anything you want to all of the UIs, and you can even round the corners by adding a
You are going to see lots of frames, but don’t worry! You can now add anything you want to all of the UIs, and you can even round the corners by adding a UICorner to them.
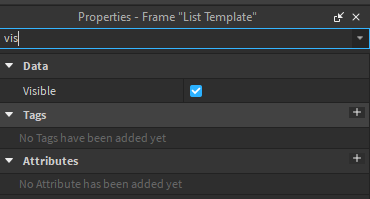
![]() If you cannot see the frames on your screen, then open up the
If you cannot see the frames on your screen, then open up the Properties tab, and then click on Visible. Make sure you set it back to the visibility it was when you found it, and place it back in the Components folder.


Section 2 - Custom Commands
Information Command - MainModule
This command will be made inside of the MainModule
![]() If we want to make a command that sends out information, we can use the
If we want to make a command that sends out information, we can use the essentialsEvent function. This command can be used for many things, for example:
- Reading out rules to players.
- Looking at the rules yourself.
- Much more
![]() For this, we will be making it so only the person that executes the command can see the outcome (a message)! So to begin, open the
For this, we will be making it so only the person that executes the command can see the outcome (a message)! So to begin, open the MainModule, and head to line 2963, and go down 22 lines to line 2985. Once you are there, you should see some code that should look like this:
{'m',sysTable.Prefix,Funcs.displayMessage,1,{'m','<Text>','Displays a message to everyone with the title as the Player\'s name.'}},
![]() Now you have found that, copy that line and go to the end of it, and then hit enter. It should start a new line, and paste that code inside on said new line.
Now you have found that, copy that line and go to the end of it, and then hit enter. It should start a new line, and paste that code inside on said new line.
![]() Now, we want the command to be called ‘:information’, so lets edit both parameters that say
Now, we want the command to be called ‘:information’, so lets edit both parameters that say m in and change it to information. Amazing, now if you go along the line a bit, you will see a number. That number represents the admin level that can use it. (0 = Non-admin 1 = Moderator, 2 = Administrator 3 = Superadmin 4 = Game Creator) We want everyone to use this command, so we will change the number from 1 to 0. After that, if you go along the line again you will see a text field that says <Text> in it. Get rid of the text inside of it, and leave it blank. Then, you can rename the description to whatever you want to. Now, it should be looking like this:
{'information',sysTable.Prefix,Funcs.displayMessage,0,{'information','','Displays a message to the player that triggered the command.'}},
![]() Now, we need to make the command do something! So lets make our on function. Go to line
Now, we need to make the command do something! So lets make our on function. Go to line 750. Hit enter, and then paste in this code:
function Funcs.informationDisplay(Args)
	local Player = Args[1]
	local Command = Args[2]
	local combinedArgs = ""

	if Command == 'information' then
		local playerPermission = returnPermission(Player)
		if playerPermission > 0 then
			essentialsEvent:FireClient(Player,'Message', 'Information', 'information here!')
		end
	end
end
![]() Now, go back to where you configured the command (line
Now, go back to where you configured the command (line 299) and change Funcs.displayMessage to Funcs.informationDisplay!
Information Command - Plugin
This command will be made inside of a Plugin.
![]() If we want to make a command that sends out information, we can use the
If we want to make a command that sends out information, we can use the remoteEvent function. This command can be used for many things, for example:
- Reading out rules to players.
- Looking at the rules yourself.
- Much more
![]() To start off, make a
To start off, make a ModuleScript inside of the Plugins folder, and rename the script to Information Command. Inside of the script, insert this code:
--[[

	 ____
	/\  _`\                    __
	\ \ \L\ \     __      ____/\_\    ___
	 \ \  _ <'  /'__`\   /',__\/\ \  /'___\
	  \ \ \L\ \/\ \L\.\_/\__, `\ \ \/\ \__/
	   \ \____/\ \__/.\_\/\____/\ \_\ \____\
	    \/___/  \/__/\/_/\/___/  \/_/\/____/


	Admin Essentials v2
	Plugin Documentation
	*coming soon^tm

	If you have any questions regarding Plugins, contact TheFurryFish.

--]]

local Plugin = function(...)
	local Data = {...}

	-- Included Functions and Info --
	local remoteEvent = Data[1][1]
	local remoteFunction = Data[1][2]
	local returnPermissions = Data[1][3]
	local Commands = Data[1][4]
	local Prefix = Data[1][5]
	local actionPrefix = Data[1][6]
	local returnPlayers = Data[1][7]
	local cleanData = Data[1][8]

	-- Plugin Configuration --
	local pluginName = 'information'
	local pluginPrefix = Prefix
	local pluginLevel = 0
	local pluginUsage = "" -- leave blank if the command has no arguments
	local pluginDescription = "Displays a message to the player that triggerd the command."

	-- Example Plugin Function --
	local function pluginFunction(Args) -- keep the name of the function as "pluginFunction"
		local Player = Args[1]
		remoteEvent:FireClient(Player,'Message','Information','Information here!')
	end


	-- Return Everything to the MainModule --
	local descToReturn
	if pluginUsage ~= "" then
		descToReturn = pluginPrefix..pluginName..' '..pluginUsage..'\n'..pluginDescription
	else
		descToReturn = pluginPrefix..pluginName..'\n'..pluginDescription
	end

	return pluginName,pluginFunction,pluginLevel,pluginPrefix,{pluginName,pluginUsage,pluginDescription}
end

return Plugin
![]() This is similar to the other command, just easier, and quicker!
This is similar to the other command, just easier, and quicker!
Got anymore custom command suggestions? Let me know down bellow!
Section 3 - On-join functions
'Defended' Message
![]() To make a
To make a Notif join when a player joins the game, all you need to do is edit the Essentials Code. To start off, go to line 1984, and insert the following code:
local function sendNotif(Title,Desc,Data)
	spawn(function()
		local notificationContainer = baseClip:WaitForChild('Container')
		local Notification = notificationContainer:WaitForChild('Template')
		local notifClone = Notification:Clone()
		local notifInner = notifClone:WaitForChild('Inner')
		local notifControls = notifInner:WaitForChild('Controls')
		local notifTitle = notifControls.Decoration:WaitForChild('Title')
		local notifExit = notifControls:WaitForChild('Exit')
		local notifOpen = notifInner:WaitForChild('Open')
		local notifDesc = notifInner:WaitForChild('Desc')
		notifClone.Name = 'Notif Clone'
		notifClone.Visible = true
		notifClone.Parent = notificationContainer
		notifTitle.Text = Title
		notifDesc.Text = Desc

		local receiveSound = Instance.new('Sound',Workspace.CurrentCamera)
		receiveSound.Name = 'Notification'
		receiveSound.SoundId = 'rbxassetid://255881176'
		receiveSound.Volume = 1
		receiveSound.Pitch = 1
		receiveSound.PlayOnRemove = true
		receiveSound:Destroy()

		notifClone.Position = UDim2.new(0,0,1,0)
		notifInner.Position = UDim2.new(0,0,1,0)
		notifInner:TweenPosition(UDim2.new(0,0,0,0),'Out','Quint',0.3,true)

		if Data[5] then
			local Tag = Instance.new('StringValue',notifClone)
			Tag.Name = "Tag"
			Tag.Value = Data[5]
		end

		local exitConnection
		exitConnection = notifExit.MouseButton1Click:connect(function()
			exitConnection:Disconnect()
			if Data[5] then
				fireServer("Notification Transfer",{"Complete Message",Data[5]})
			end
			for a,b in pairs(Stacks.Notifs) do
				if b == notifClone then
					--table.remove(Stacks.Notifs,a)
				end
			end
			--notifClone:Destroy()
			figureNotifs(Stacks.Notifs,notificationContainer)
		end)

		local openConnection
		openConnection = notifOpen.MouseButton1Click:connect(function()
			openConnection:Disconnect()
			fireServer('Notification Transfer',Data)
			for a,b in pairs(Stacks.Notifs) do
				if b == notifClone then
					table.remove(Stacks.Notifs,a)
				end
			end
			notifClone:Destroy()
			figureNotifs(Stacks.Notifs,notificationContainer)
		end)
		table.insert(Stacks.Notifs,notifClone)
		figureNotifs(Stacks.Notifs,notificationContainer)
	end)
end

local layoutConnection
![]() Amazing, now go down the the verry bottom of the code, and insert this:
Amazing, now go down the the verry bottom of the code, and insert this:
wait(0.1)
sendNotif('Admin System','This server is defended.',{'clear'})
![]() All done!
All done!
'Welcome' PM
In progress ![]()
This post is in constant development…
Right now, I am making some more things to add to this- so keep an eye out for edits, and I will let you know when the changes have been published!
- Yes
- No
- 1
- 2
- 3
- 4
- 5
- 6
- 7
- 8
- 9
- 10