Recently, I’ve noticed that Basic Admin Essentials 2.0 has a lot of questions about changing the names of admin levels, creating more admin levels, customizing them with rounded corners, server is defended notifications and much more so I decided to create a community tutorial on this.
Before we start with the system, you’d need to get this model for this to work. Once you have the model, ungroup it in ServerScriptService and simply watch below how to do what you need.
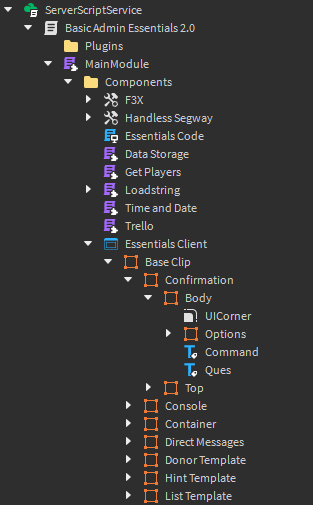
Rounded UI's
To round off a UI of basic admin, simply follow these steps:
- Locate Essentials Client Under MainModule → Components.
- Open Base Clip.
- Find your UI and add a UICorner to it’s Body frame.
And done!
Admin Names
- Under Mainmodule → Components, find Essentials Code and open.
- Go to line 2585 and edit as directed.
The code looks like:

Please do not edit the DP or the code will break, you can edit the print statement “Basic Admin Essentials 2.0”.
Server is Defended
This may be a bit complex but follow correctly!
- Open Essentials Code (Under Mainmodule → Componenets)
- Paste the following code at line 1984:
local function sendNotif(Title,Desc,Data)
	spawn(function()
		local notificationContainer = baseClip:WaitForChild('Container')
		local Notification = notificationContainer:WaitForChild('Template')
		local notifClone = Notification:Clone()
		local notifInner = notifClone:WaitForChild('Inner')
		local notifControls = notifInner:WaitForChild('Controls')
		local notifTitle = notifControls.Decoration:WaitForChild('Title')
		local notifExit = notifControls:WaitForChild('Exit')
		local notifOpen = notifInner:WaitForChild('Open')
		local notifDesc = notifInner:WaitForChild('Desc')
		notifClone.Name = 'Notif Clone'
		notifClone.Visible = true
		notifClone.Parent = notificationContainer
		notifTitle.Text = Title
		notifDesc.Text = Desc

		local receiveSound = Instance.new('Sound',Workspace.CurrentCamera)
		receiveSound.Name = 'Notification'
		receiveSound.SoundId = 'rbxassetid://255881176'
		receiveSound.Volume = 1
		receiveSound.Pitch = 1
		receiveSound.PlayOnRemove = true
		receiveSound:Destroy()

		notifClone.Position = UDim2.new(0,0,1,0)
		notifInner.Position = UDim2.new(0,0,1,0)
		notifInner:TweenPosition(UDim2.new(0,0,0,0),'Out','Quint',0.3,true)

		if Data[5] then
			local Tag = Instance.new('StringValue',notifClone)
			Tag.Name = "Tag"
			Tag.Value = Data[5]
		end

		local exitConnection
		exitConnection = notifExit.MouseButton1Click:connect(function()
			exitConnection:Disconnect()
			if Data[5] then
				fireServer("Notification Transfer",{"Complete Message",Data[5]})
			end
			for a,b in pairs(Stacks.Notifs) do
				if b == notifClone then
					--table.remove(Stacks.Notifs,a)
				end
			end
			--notifClone:Destroy()
			figureNotifs(Stacks.Notifs,notificationContainer)
		end)

		local openConnection
		openConnection = notifOpen.MouseButton1Click:connect(function()
			openConnection:Disconnect()
			fireServer('Notification Transfer',Data)
			for a,b in pairs(Stacks.Notifs) do
				if b == notifClone then
					table.remove(Stacks.Notifs,a)
				end
			end
			notifClone:Destroy()
			figureNotifs(Stacks.Notifs,notificationContainer)
		end)
		table.insert(Stacks.Notifs,notifClone)
		figureNotifs(Stacks.Notifs,notificationContainer)
	end)
end

local layoutConnection
- Scroll to the end of the code at line 2720, leave one line and type the following:
wait(2)
sendNotif('Anti-Exploit','This server is defended.',{'clear'})
This will make the notification “Anti-Exploit”, “This server is defended.”
Adding more admin levels
Instead of me typing every step about this here, there is a youtube video which is highly recommended since by typing it may be hard for you to understand.
You can go watch it here: Adding more admin levels.
These are common things that I saw people having problems in. If you’d want me to make you things that aren’t mentioned here, please message me in the forum and I’ll get back to you.
I hope this post helped you, so I want to know if it did!
- Yes.
- No.
- Slightly yes.
- Slightly no.