how would I code a Ui like this when you join event center in host a event this ui well pops up on your hotel game

Id use messaging sevice to communicate between the two servers.
okie dokie (sowwy im late)
first
you want your UI fully setup and configured.
make sure you have a ScreenGui parented to StarterGui
under the ScreenGui, you should have a main Frame or alternatively main CanvasGroup that contains the rest of your objects
your button ideally should be a TextButton or ImageButton object with the ZIndex property of the button greater than the ZIndex of all other objects.
i typically recommend using CanvasGroups over Frames because:
CanvasGroups haveGroupproperties (e.g.GroupTransparency,GroupColor) that affect all of their descendant’s properties, which is REALLY useful for scripting effects.CanvasGroupshave the ability to act as a masking layer and it automatically hides anything out of bounds.
these two are demonstrated here:
remember though, CanvasGroups are relatively new and some stuff might be bugged/dysfunctional. you ALWAYS want to make a separate button layer above everything else to serve as a “hitbox” for touch input, etc, when using CanvasGroups. but i’m not an experienced ui designerr or so, i specialize in scripting so ig i can’t speak
second
you want your UI to be visible smoothly on ALL devices right? if not then skip this
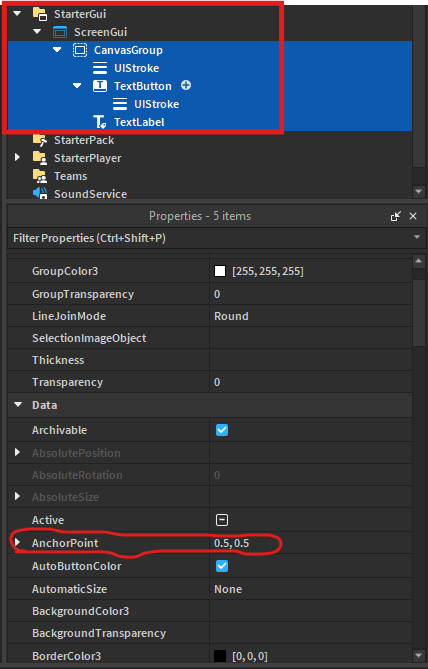
for scaling the UI, make sure all of the objects have an AnchorPoint set to 0.5, 0.5. the position of everything will now move, but dw! just move it back and itll work normally
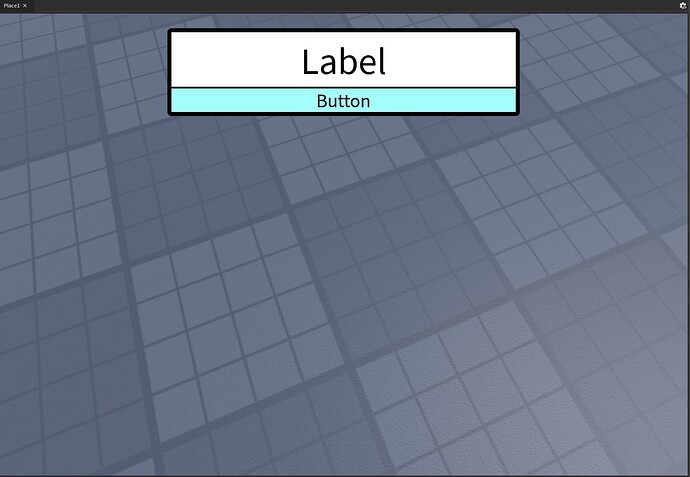
uptill here, this is what you should have:
[VERY VERY BAD UI]
now, you should get this plugin for ease of scaling:
after downloaded, don’t forget to install in Studio if you have it opened:
- open the
Viewtab
- click
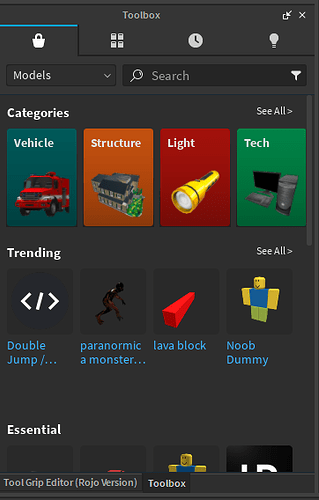
Toolbox
you’ll seeToolboxopen on its usual docking location:
- follow the steps in the video shown:
for me, it’s a grayed-out “Installed” button because i already installed it into my place file, however, for you, if you don’t have it installed, it’ll be a blue “Install” button. click that and it’ll install
ok now
you want to open your plugin right?
ok so
- open the
Pluginstab
- you’ll find the
AutoScale Liteplugin somewhere there
i found mine!!

ok great you found your plugin!! now let’s use it
open the menu, and while having selected ALL elements under the ScreenGui (press Shift to select groups of objects at once, or alternatively Ctrl (for Windows users) to select individual objects) liek this:
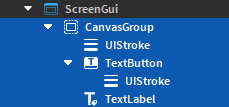
then on the plugin, click the carrot towards the bottom of it and click Unit Conversion:
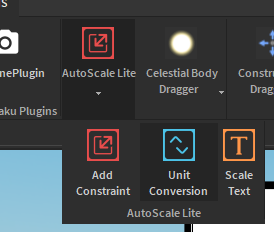
you’ll see a popup like this:
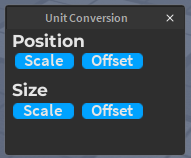
i recommend you click the Scale option under Size for well-functioning, intended usage, but you can do whatever you want tbh
after doing this, you might think you’re done. but you’re not unless you want unlocked scaling. this should be what you have right now:
yeah. pretty weird isn’t it? the ASPECT RATIO doesn’t stay locked.
ok so to fix this:
- select all the elements like i told u earlier
- under the plugin carrot, click
Add Constraint
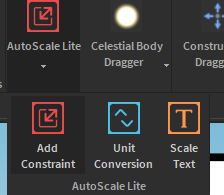
BOOM!
hell yeah that’s much better
ok good news: scaling is DONE!
bad news: we still have to script now ![]()
the raw UI .rbxm file that i used (doesn’t contain the code)
to import this, right click on StarterGui and click Insert from File..., and then upload this file:
theUI.rbxm (9.5 KB)
third
ok gang let’s get ready to code lalala
what i had earlier that did NOT frickin work (my dumb ahh ignored that `LocalScript`s in `StarterGui` get refreshed on death and so it pops up whenever u die 💀 do NOT make this mistake like me 💀💀💀)
you’ll surely be able to find more if this doesn’t help
anyways
now we’ll define paths to variables that we’ll be using.
you should definitely define paths to the objects that you’ll be animating if you consider animating your UI, however, since i’m not, i’m just going to define a path to the button:
local canvas = script.Parent
local button = canvas:WaitForChild("TextButton")
i could also just do:
local button = script.Parent:WaitForChild("TextButton")
next, we’re going to insert a BoolValue under the LocalScript and leave the value false by default.
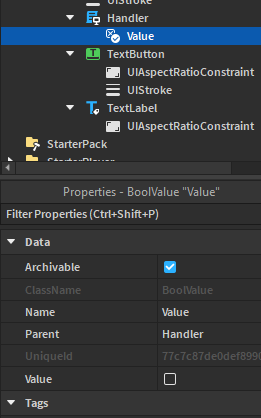
local hasUsed = script.Value.Value
next, let’s set some preliminary setup. let’s say i want the ui to be visible 5 seconds after the player joins. for that, i want the canvas’s Visible property to be false beforehand!!
canvas.Visible = false
next, let’s move on to the main conditional statement that nests functions within it
if not hasUsed then
	hasUsed = true

	task.delay(5, function()
		canvas.Visible = true
	end)
	button.Activated:Connect(function()
		canvas.Visible = false
		-- do yada yada here


		-- for the very end
		script:Destroy() -- please remember to keep this AFTER all other code and effects. for tweens, i recommend you use tween.Completed:Wait() so it doesn't destroy immediately after the tween starts.
	end)
end
function to ensure that it doesn’t show again when we die.
ok i’ll explain this now:
- i used the bool-value because the
LocalScriptmay run every time the player dies, but you don’t want that to popup whenever they die do you?
so, i made a bool-value set to false by default - note that i did not make the bool-value a boolean variable within the code and set it to false at the start; because the code would run everytime the player dies, and the boolean would keep getting set to false and the code would keep running, which isn’t intended behavior and ruins the literal point. - i used task.delay() to schedule the function/coroutine for making the canvas visible to be called or resumed on the next
Heartbeatafter my given duration, which was 5 seconds, has passed, without throttling.
therefore, we were able to achieve the canvas being visible 5 seconds after the player has joined via task.delay(). - i used a function that connects to
button.Activatedthat fires when the button is “activated”, or clicked. this property is only available forTextButtons andImageButtons (in relation to UI objects—ofc it’s there withTools, etc); else you’d have to useMouseButton1ClickorMouseButton1Downif it’s a separate object. and yes, dw, BOTH of these are mobile compatible as far as i have tested. - i added
script:Destroy()within the button-activated function (which will only destroy it FOR the localplayer) just for extra security to make sure it doesn’t show again
ok now working stuff:
- insert a new
LocalScriptinStarterPlayer>StarterPlayerScripts - name it whatever the sigma you want (i named it
Handlerbut it really doesn’t matter)
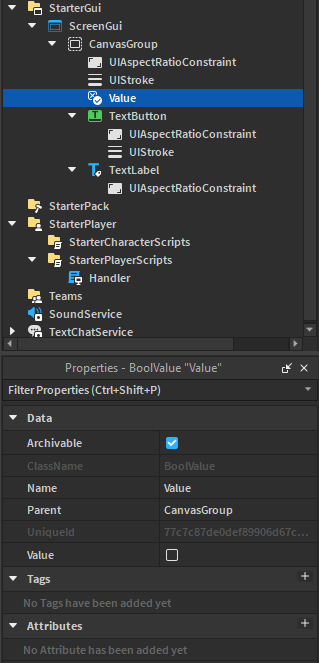
what you should have so far:

- insert a new
BoolValueinto the main canvas/frame in your UI holding all other objects.
okk now we need to script!!
in the LocalScript:
delete the usual
print("Hello World!")
code
yaaay fresh new empty script!!!
the standard convention of coding is to start by defining any services you need.
the first service that we will need, is the Players service!
you can define it like this:
local Players = game:GetService("Players")
you can define any more services you might need!
if you are planning on using effects, you should define the TweenService service:
local TS = game:GetService("TweenService")
since i’m lazy, i wont be making effects for you. but you can surely watch this tutorial here:
you’ll surely be able to find more if this doesn’t help
anyways
okk now let’s define paths to actual variables and objects instead of services
since this is a LocalScript, we can directly access the player object via Players.LocalPlayer as shown below:
local player = Players.LocalPlayer
now we need to access the player’s PlayerGui object!
local playerGui = player:FindFirstChild("PlayerGui")
next, let’s access our ScreenGui object under the player’s PlayerGui object:
local ui = playerGui:WaitForChild("[replace this with the name of your ScreenGui object]")
for me, the name of my ScreenGui object is literally “ScreenGui”! ![]() thus, i will reference it like this:
thus, i will reference it like this:
local ui = playerGui:WaitForChild("ScreenGui")
okk, let’s access all other objects that we need. you’ve pretty much got the hang of it so yeah. our most priority object will be the button object since we need that to connect to a click function. you can also reference any other objects you’ll need for animation and effects.
for me, i’ll firstly reference my main canvas since that’s where all my other priority objects are parented to and i don’t want to have to keep typing ui:WaitForChild("CanvasGroup") when i can just type canvas !!
i’ll also reference the path to the button object that we’ll need:
local canvas = ui:WaitForChild("CanvasGroup") -- or whatever ur main holding object is named
local button = canvas:WaitForChild("TextButton") -- or whatever the path to ur button is
now that we have that referenced, we also need to reference the BoolValue that we created earlier. in the reference, you shouldn’t just reference the instance but the Value property of the instance since that’s what we’re changing (else whenever you’re changing its property, you’ll have to add a .Value to the variable name):
local hasUsed = canvas:WaitForChild("Value").Value
this should also be a great time to mention that you should set the main frame/canvas’s Visible property to false:
ok back at coding again, let’s script some preliminary setup. the main setup we need for this is to ensure that the main frame/canvas’s visibility is false:
canvas.Visible = false
let’s get to the main code now!
we start off by creating a conditional statement that checks if the value of the hasUsed variable is false, and if it is, then we make the value of the hasUsed variable true:
if not hasUsed then
	hasUsed = true
end
this works off of basic “debounce” coding logic, except we don’t ever set the variable to false again.
now, i want the popup to show 5 seconds after i join.
for this, within the conditional statement, we’ll nest a task.delay() function (which schedules a function/coroutine to be called or resumed on the next Heartbeat after the given duration (in seconds, which in this case, we’re targeting 5 seconds) has passed, without throttling) such that after 5 seconds, a function will be called to make the canvas visible:
task.delay(5, function()
	canvas.Visible = true
end)
let’s put this within the conditional statement now:
if not hasUsed then
	hasUsed = true

	task.delay(5, function()
		canvas.Visible = true
	end)
end
now, we want another function such that when the button is clicked (for which we’ll use a property available solely for TextButtons and ImageButtons only [when talking about UI objects; ofc it’s available for Tools, etc]—button.Activated—to determine when the button is clicked. alternatively, if you’re not using a TextButton or ImageButton for the button, you can just use MouseButton1Click or MouseButton1Down (and dw, both are mobile compatible as far as i have tested):
button.Activated:Connect(function()
	canvas.Visible = false
	-- do yada yada here
end)
let’s put this within the conditional statement now:
if not hasUsed then
	hasUsed = true

	task.delay(5, function()
		canvas.Visible = true
	end)
	button.Activated:Connect(function()
		canvas.Visible = false
		-- do yada yada here
	end)
end
so, this should be our whole code:
local Players = game:GetService("Players")
local player = Players.LocalPlayer
local playerGui = player:FindFirstChild("PlayerGui")
local ui = playerGui:WaitForChild("ScreenGui") -- or whatever ur ScreenGui object is named

local canvas = ui:WaitForChild("CanvasGroup") -- or whatever ur main holding object is named
local button = canvas:WaitForChild("TextButton") -- or whatever the path to ur button is

local hasUsed = canvas:WaitForChild("Value").Value

canvas.Visible = false

if not hasUsed then
	hasUsed = true

	task.delay(5, function()
		canvas.Visible = true
	end)
	button.Activated:Connect(function()
		canvas.Visible = false
		-- do yada yada here
	end)
end
anyways, for the rest of your code, depending on what you have to do on the button click, you can do it under the
-- do yada yada here
comment. for example, you can use TeleportService (remember to save this as a service variable at the TOP of your LocalScript near where i explained you can store the TweenService service) to teleport the player to another Place experience, or you can use :PivotTo() on the character’s HumanoidRootPart to teleport the character to a CFrame within the game, etc.
now please remember that in the code i’ve provided, you’re REQUIRED to click the button to make the UI go away. it’s pretty simple to script some sort of timeout so you can definitely do that.
and again, feel free to use TweenService to animate your UI!
YAAAY YOU DID IT!!!
here’s a video showing it functional:
if you want to skip through all my instructions and 4 hours of typing, recording, coding, debugging, formatting, ui designing, etc (i’ll be  but)
but)
here’s the .rbxm file:
myTutorialMainModel.rbxm (12.5 KB)
you can just right-click on Workspace, and then click Insert from File... and upload the file above. afterwards, i added an instructions page that you can read and follow instructions to setup.
OR
here’s the free model i uploaded’s creator marketplace link:
OR
here’s the place file i used for the demo with everything working:
uipopuponjoinDemo.rbxl (65.4 KB)
you can just download it, then open it, and boom!
uhhh enjoy! (mb i made it too long ![]() )
)
and if you even read this mark me as solution pslspslpslspsl ![]() i spent hours on this for u
i spent hours on this for u
