Hello and welcome! ![]()
I’m sure most of you know about the RichText feature.
This is a feature on Roblox that allows you to customize different parts of the text in one string.
It’s quite a useful feature and will make your life a lot easier when customizing strings.
Rich text is useful for producing text that looks like this:
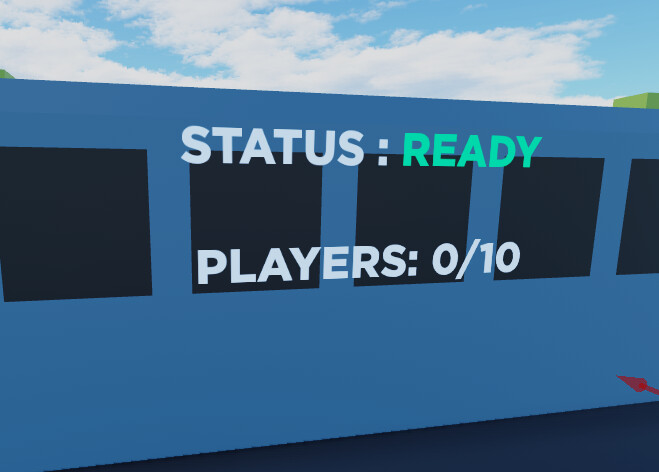
Or, like this:
Pretty, cool; huh?
So now that you’ve seen what we can do with rich text! Let’s get into how you use rich text.
Rich text isn’t complicated; you can even get the hang of it in under 5 minutes.
If you know some HTML you will find this super easy!
Alright, let’s get started!
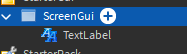
We’re gonna start off by making a screenGui.
To add a screen Gui do the following:
Locate the StarterGui Folder:
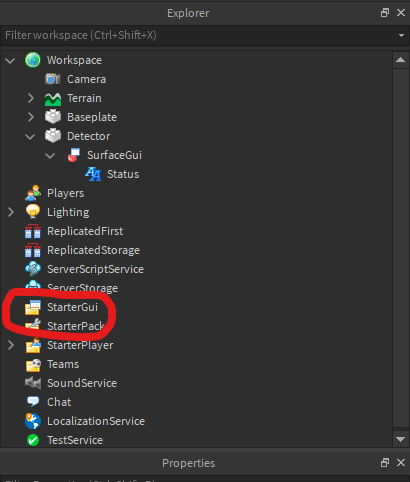
Once you have found that click on the + symbol next to the StaterGui folder and insert a “screenGui”.
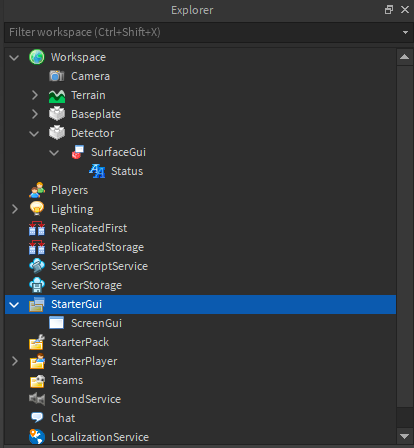
Shortly Following that, click on the + symbol next to the ScreenGui button and insert a “Textlabel”.
Now we’ve got that done, we can get onto the fun stuff!
How to use rich text.
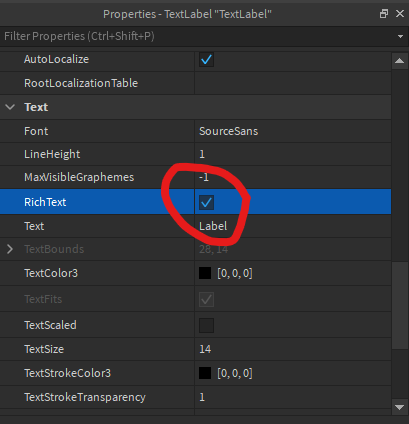
First, we need to make sure that we can actually use rich text, we must enable it.
THIS STEP IS SUPER IMPORTANT
Go to the properties of your textLabel and then under the “Text” category enable the “RichText” feature by clicking on the check-box next to the option.
It’s now time to show you the basics of RichText!
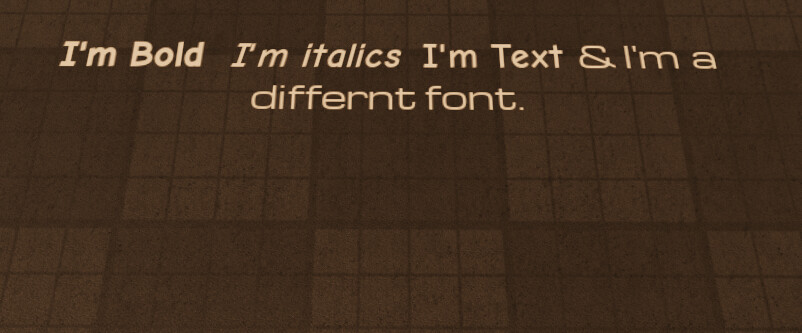
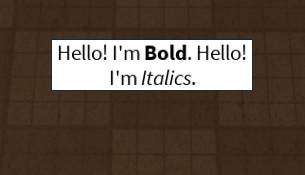
We’re gonna show you how to make a text that shows something like this:
Hello! I’m Bold. Hello! I’m Italics.
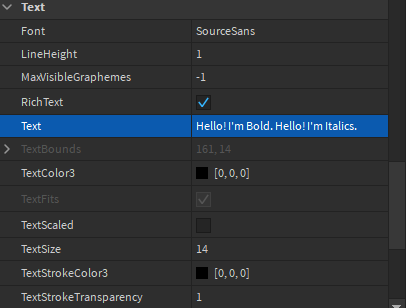
First, go to your text parameter inside your textLabel and set it to:
Hello! I'm Bold. Hello! I'm Italics.
Now you should notice a singular change:
- The Textlabel now shows "Hello! I’m Bold. Hello! I’m italics.
It should now be showing something like this:

Nice!
Now we are going to make the word “Bold” and “Italics” BOLD and ITALICS
How do we do this?
I’m going to show you the basics of using the “Bold” & “Italics” tags.
These are the bold Tags:
<b>

</b>
And these are the italic Tags:
<i>

<i>
At the moment these will do nothing, however: we can use them to make certain words or phrases have a different appearance.
E.g:
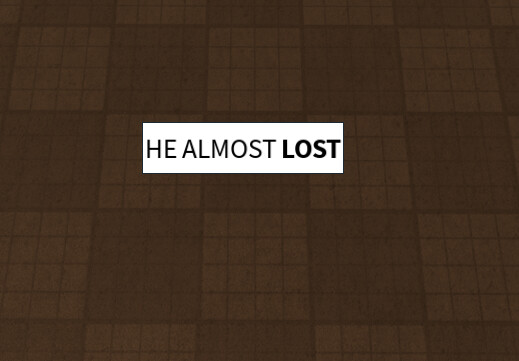
If we want to make the words “HE ALMOST LOST” in bold, we can use the bold tags!
Just like this:
<b>HE ALMOST LOST</b>
And if you wanted just the word “Lost” in bold, you can do this:
c
This is the same for every other tag!
Now what we’re gonna do is we will insert it into Roblox studio!
This is super simple!
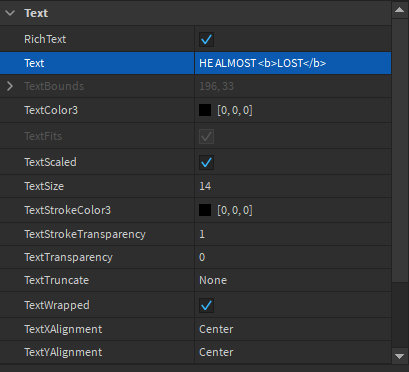
Just go to your “Text” parameter and try pasting in:
HE ALMOST <b>LOST</b>
Look at the end output:
Pretty neat, right?
Now with that new knowledge try making the phrase we made up earlier:
Hello! I’m Bold. Hello! I’m Italics.
You should get something like this:
If you need help look at this:
Try this code:
Hello! I'm <b>Bold</b>. Hello! I'm <i>Italics</i>.
This works as we are using the bold and italic tags over the words we want to apply the effect too!
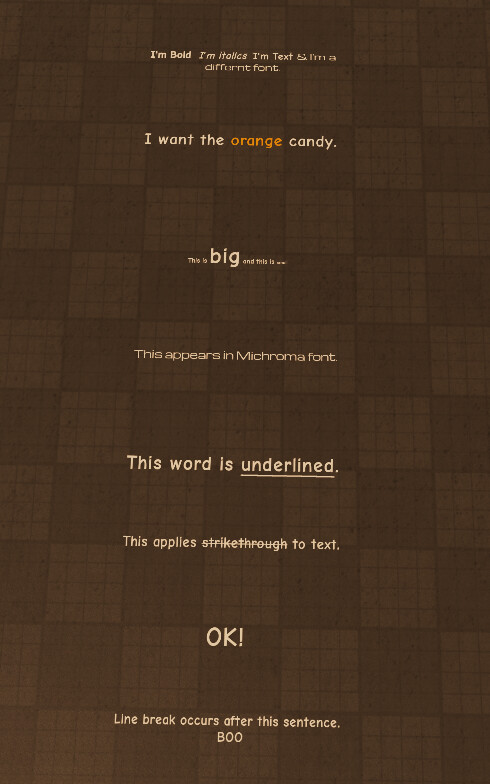
Now that we have got the basics done try experimenting with these different tags:
|Formatting| |Tag(s)|Examples|
|—|—|—|—|—|—|
| Color||<font color="">| I want the <font color="#FFA500">orange</font> candy.
| Size||<font size="">| This is <font size="50">big</font> and this is <font size="10">small</font>
| Font Face *||<font face="">| <font face="Michroma">This appears in Michroma font.</font>
| Bold||<b>| This is a <b>bold</b> word.
| Italic||<i>| This is an <i>italicized</i> word.
| Underline||<u>| This word is <u>underlined</u>.
| Strikethrough||<s>| This applies <s>strikethrough</s> to text.
| Comment|| <!-- -->| OK! <!--this comment does not appear in the final text-->.
| Line Break|| <br />| Line break occurs after this sentence.<br />
| Small Caps||<smallcaps><sc>| My name is <smallcaps>Diva Dragonslayer</smallcaps>.
*Font face names can be found in the Name column of the Font reference page.
I hope this tutorial taught you how to use Rich Text!
Example Place Picture:
If you want an example place, download it down below:
FancyTextrbxl.rbxl (30.0 KB)
Happy developing,
 Thanks!